Showing posts with label 3-D projects. Show all posts

3/23/10

Shower Gifts

Hi! I wish I had time to scrap tonight because I am in the mood for it, but I have to babysit George tonight in about an hour. Sometimes things just don't work out! I'll share with you the rest of the gifts I made for Christine for the bridal shower this past weekend. First up is this card set and matching box. The pattern for the box was found on Splitcoast Stampers, and I used Unity Stamps to decorate the outside lid.


These are the cards I made to go inside:

Each features a birdie stamp from Hero Arts and sentiment stamp from SU!. Each card has the same design, but different patterned paper.
My final gift was the card (because really the card is like a gift, right?) I used this adorable SU! image from a mini catalog a few years ago, as well as BG "Porcelain" paper. The bride was stamped in Craft Chocolate Chip ink and then covered in clear EP and embossed. I cut the roses out of the BG paper, and the leaves from a Sizzlit die with my Big Shot.
Here is the inside:
Thanks for stopping by!

3/18/10

Newlywed Banner!

I haven't had much scrappy time this week, but instead a lot more personal things going on. However, I had no school on Monday because the town water main burst and there was no water (funny because most of NJ had too much water over the weekend), so I was able to work on this wedding gift for my brother and his fiance. The bridal shower is this weekend, and I wanted to give a gift in addition to the bridal party's gift. This is part 1: a fabric banner! First, I have to say the photos do not do it justice because it was cloudy and rainy still on Monday and they are a bit dark, but it is soooo pretty in real life!


To make, I used wonder-under and ironed it onto the fabric, and then ran that through my Big Shot with the SU! banner die cut. I then stitched around the inside of the banner with a straight stitch (on the sewing machine). I used some In-Color grosgrain polka dot ribbon from SU! to connect the banner, and all I did was pin the ribbon to each banner and then run it through my sewing machine to adhere them together with a zig zag stitch. I then embellished the front by making these cute fabric flowers and then cutting the letters from my Big Shot out of chipboard and paper.

The whole process really only took me 1 and 1/2 hours! Here is a close-up of each letter: (RHC, for Robby, Heyrich (our last name), Christine)
Thanks for stopping by!

12/21/09

Christmas Tags


I made these tags tonight using my Cricut and the Very Merry Tags cartridge (which was a limited edition mini-cartridge this winter). I used some glitter paper, cardstock, and rhinestones to put these together. They are attached to some cookie tins, which are gifts for some co-workers. Merry Christmas Week!

12/1/09

For Sara!


Hi! I've been a very bad blogger, and Sara has reminded me of this, so this post is for you Sara! I made this advent calendar for the Christmas season and I thought I'd share it here. I used dp by My Mind's Eye, and all die cuts were cut with my Cricut machine, and then inked with SU! inks. I used the 2 Christmas cartridges I have: Winter Woodland and Joy's of the Season to cut all images.

Here is a close up of some of the tins:

I also made a "December Daily" album for the season, inspired by Ali Edwards. I will share as soon as I have added some pics to it! I'm trying to figure out the best way to print pics each day without going to the photo store. My home printer just doesn't seem to be up to par tonight, though!

Talk to you soon!

4/2/09

Bird Houses


These are the favors that Christine and I made for her and my brother's engagement party.  I found the template for the birdhouses on Nichole Heady's blog.  The roof and the base are made with  scallop nesties.  All dsp is from SU!.  We made 40 of these birdhouses, and at the end of the party only 6 were left! Our guests loved them, and they were the perfect favor to complement our spring theme.

We purchased the tree branches, and buckets at G and G (a florist outlet store), and filled the buckets with sand, and then covered the sand with some river rocks.

Hope you enjoy seeing our favors!

2/12/09

Valentine's Mailboxes


Good evening! I was blog browsing this evening, and saw these adorable creations by Christine and fell in love. Yes, I've seen the mailboxes before, have even had them laying around my house for at least 2 years, but something about her design caught my eye.  It inspired me to make my own, following her layout pretty closely.  These will be gifts for my 2 good college friends who I'll see on Valentine's Day (I just have to drop by Target tomorrow for some goodies to fill it with!).  
I used the "Candy Lane" dsp by SU!, along with the "Love You Much" stamp set.  For the cover, I added a Sizzix scallop circle die cut, and then cut some circles with my CM tools (the SU! cutting system is on backorder).  I stamped the heart and colored it in, then used my glue pen to cover the whole heart in glue and add some Martha Stewart glitter.  I tied on some random ribbon on the arm, and added some matching primas.  I used my SU! full heart punch to punch a heart out of acetate, and then added some flowers to it for the arm handle.

Thanks for stopping by tonight!

10/12/08

Boo Banner!


I am on a roll with these Big Shot banners! I told you I had a ton of ideas floating around in my head. In fact, I pictured this one last night as I was trying to fall asleep, and it kept me up for awhile!  I hung this boo banner on the hutch in my dining room, and it was just the size to fit along the doors.  

Here are some banner details:  I used K  & Co. dp, along with SU! paper.  I used the new Fence wheel from the SU! mini catalog, and the Halloween image stamp set.  The little images on the fence were stamped and them embossed with iridescent ice.  I cut them out and placed them on the fence.  The letters are monogram letters from Close to My Heart, and fit pretty well on the pennants.  I used my cropadile to punch holes in each of the scallop edges along the larger pennant.  I used my paper piercer to put smaller holes in the smaller pennant.  I think that's all, hope you enjoyed it!

10/11/08

Thankful for Big Shot!


Good evening! Today, I started my 3 day weekend, since I have Monday off for Columbus Day. I am super excited!  I spent some time making some stamping things this afternoon, and tried out my Big Shot Pennant die to make a banner for the fall.  I am in love with how this turned out! I used the Haiku dp from SU! and cardstock to make the pennants.  I also used the stamp set "True Friend" to stamp the images.  For the letters, I used the Simon on board chipboard letters, which I coated with chocolate chip craft ink and then coated with clear embossing powder and heated them. This gives them a glossy look.  On my stamped images I coated some with Stickles, and added rhinestone brads, or filigree brads.  I've included a picture of the banner on my dining room mantel, and them close-ups of each pennant.

Now I've got lots of gift ideas floating through my head!

9/6/08

Big Shot is in the House!

Hi all! If you haven't heard already, SU! has partnered with Sizzix to have their own line of special die cuts! The designs by SU! are just beautiful and coordinate so well with many stamps. My order came yesterday, and I had a chance to play around with them today.

The possibilities are endless!  I first tried the Basket and Blooms die, which cuts out an 
adorable basket. With some sticky strip, the basket is together in a flash. I decorated the outside with the "Cheers to You" stamp set.  The So Saffron scallop is from a die also, with this scallop and a larger scallop.  

This next card uses the largest scallop circle die cut as a card base. I cut out the scallop on white paper, leaving the top edge off the scallop so 
that it would stay together and leave me a card. I then layered a scalloped circle cut in Riding Hood Red over the white base.  I created the ornament hook with paper.  The "noel" is colored in with reinkers and an aquapainter.

My last card is my favorite! It uses the "Bird with Leaves and Flowers" die cut.  I cut the large scallop in Riding Hood Red, then cut the bird, branch and leaves, which all come on the same die.  The Tangerine Tango leaves are from a Creative Memories punch.  On the large scallop circle, I stamped these leaves from "True Friend" in Versamark, and embossed them with clear EP.  I added dimension to the leaves and branch by inking them with a dauber and ink.  

Have a great rest of your weekend, we are feeling the effects of  Hurricane Hanna right now!

8/28/08

Just a little something!

A few months ago, a good friend of mine graduated from college, and I couldn't make it to her graduation party. I will be seeing her tomorrow, so I spent some time today making her a few accessories for her new teaching career that is ahead of her!  I hope she enjoys them!  Here is a picture of the whole gift, but I've also included pictures of each thing individually.  I used the same supplies for each piece: Washington Apple DP, Eastern Blooms and Office Accoutrement stamp sets, Riding Hood Red, Pumpkin Pie, So Saffron, and Bashful Blue cardstock and ink.  

Now for individual pictures and explanations. This is an acrylic picture frame that I turned into a post-it note holder. The main decorations were done on the sheet of DP which was then slipped into the frame. The frame sits with the ledge on the top. I used mini crystal flowers from Kaisercraft in the center of each stamped flower (which were attached on the outside of the frame).
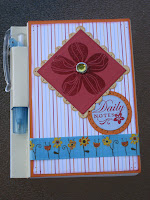
This is a mini notepad. The actual pad is from Michael's $ bin, but I covered the front with my own decoration.

This is a picture of the pencil pouch. I had made one of these last Valentine's Day for my Secret Valentine at school, and I knew it'd go perfect with this ensemble.  The holder is constructed out of cardstock, and then decorated.

This is a mini post-it holder.  I constructed the holder out of cardstock so that it would fit the mini flags that I got in the Target $ bin.  The flags are like the Post-it brand ones that you can use to mark a page in a book.  Here is a picture of the inside and outside:

Hope you enjoyed seeing these projects!